折腾了我一周,原来Netty网络编程就是这么个破玩意儿!
1、阻塞
阻塞模式下,相关方法都会导致线程暂停ServerSocketChannel.accept 会在没有连接建立时让线程暂停SocketChannel.read 会在通道中没有数据可读时让线程暂停阻塞的表现其实就是线程暂停了,暂停期间不会占用 cpu,但线程相当于闲置单线程下,阻塞方法之间相互影响,几乎不能正常工作,需要多线程支持但多线程下,有新的问题,体现在以下方面32 位 jvm 一个线程 320k,64 位 jvm 一个线程 1024k,如果连接数过多,必然导致 OOM,并且线程太多,反而会因为频繁上下文切换导致性能降低可以采用线程池技术来减少线程数和线程上下文切换,但治标不治本,如果有很多连接建立,但长时间 inactive,会阻塞线程池中所有线程,因此不适合长连接,只适合短连接
服务端代码
public class Server {public static void main(String[] args) {// 创建缓冲区ByteBuffer buffer = ByteBuffer.allocate(16);// 获得服务器通道try(ServerSocketChannel server = ServerSocketChannel.open()) {// 为服务器通道绑定端口server.bind(new InetSocketAddress(8080));// 用户存放连接的集合ArrayList
channels = new ArrayList<>();// 循环接收连接while (true) {System.out.println("before connecting...");// 没有连接时,会阻塞线程SocketChannel socketChannel = server.accept();System.out.println("after connecting...");channels.add(socketChannel);// 循环遍历集合中的连接for(SocketChannel channel : channels) {System.out.println("before reading");// 处理通道中的数据// 当通道中没有数据可读时,会阻塞线程channel.read(buffer);buffer.flip();ByteBufferUtil.debugRead(buffer);buffer.clear();System.out.println("after reading");}}} catch (IOException e) {e.printStackTrace();}}}客户端代码
public class Client {public static void main(String[] args) {try (SocketChannel socketChannel = SocketChannel.open()) {// 建立连接socketChannel.connect(new InetSocketAddress("localhost", 8080));System.out.println("waiting...");} catch (IOException e) {e.printStackTrace();}}}运行结果
客户端 - 服务器建立连接前:服务器端因 accept 阻塞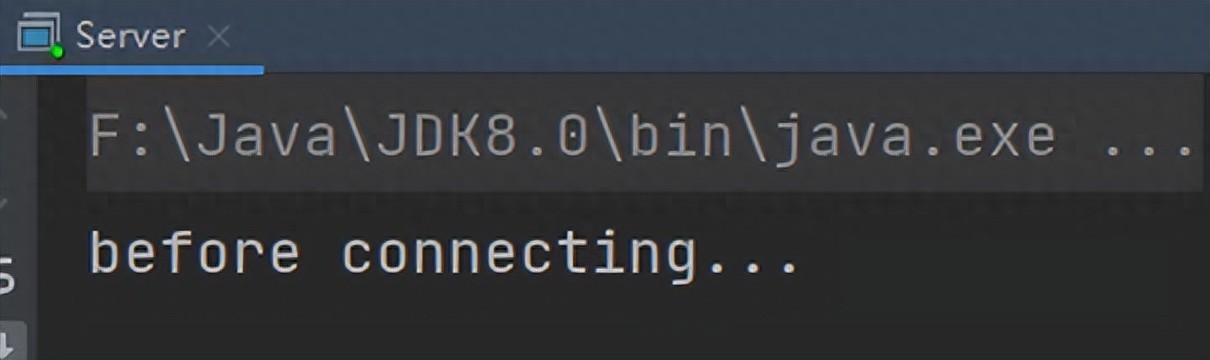
客户端 - 服务器建立连接后,客户端发送消息前:服务器端因通道为空被阻塞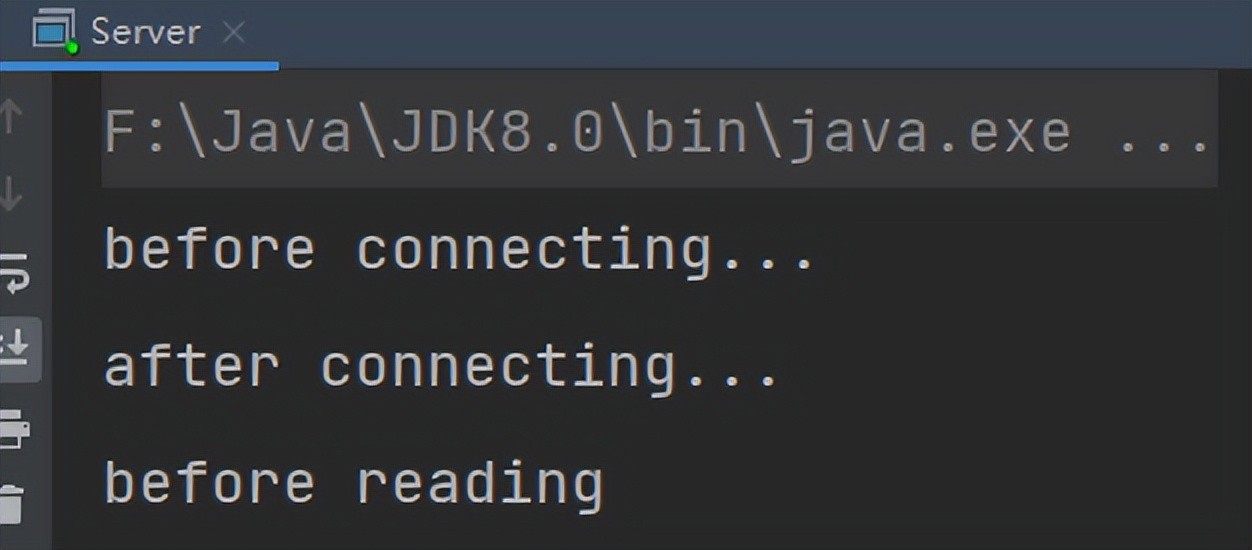
客户端发送数据后,服务器处理通道中的数据。再次进入循环时,再次被 accept 阻塞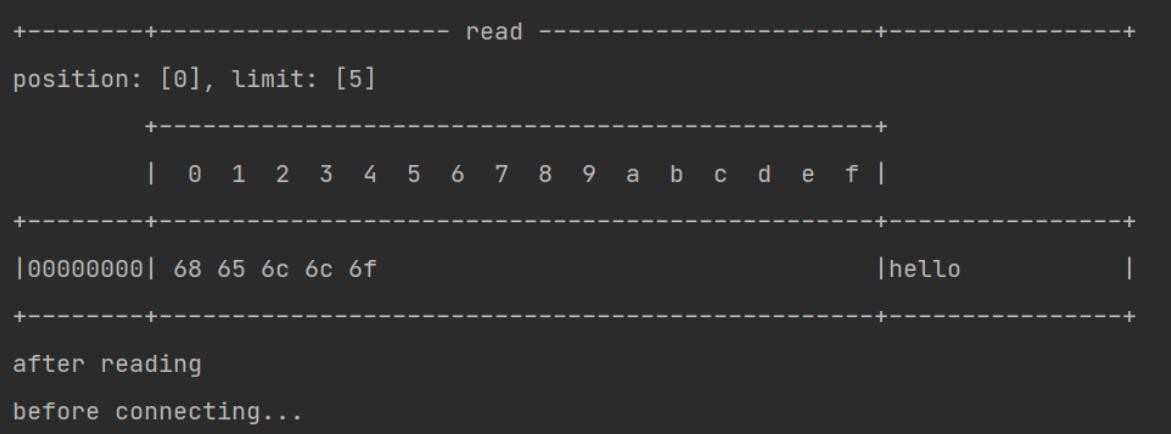
之前的客户端再次发送消息,服务器端因为被 accept 阻塞,无法处理之前客户端发送到通道中的信息
2、非阻塞
可以通过 ServerSocketChannel 的 configureBlocking (false) 方法将 获得连接设置为非阻塞的。此时若没有连接,accept 会返回 null可以通过 SocketChannel 的 configureBlocking (false) 方法将从通道中 读取数据设置为非阻塞的。若此时通道中没有数据可读,read 会返回 - 1服务器代码如下
public class Server {public static void main(String[] args) {// 创建缓冲区ByteBuffer buffer = ByteBuffer.allocate(16);// 获得服务器通道try(ServerSocketChannel server = ServerSocketChannel.open()) {// 设置为非阻塞模式,没有连接时返回null,不会阻塞线程server.configureBlocking(false);// 为服务器通道绑定端口server.bind(new InetSocketAddress(8080));// 用户存放连接的集合ArrayListchannels = new ArrayList<>();// 循环接收连接while (true) { SocketChannel socketChannel = server.accept();// 通道不为空时才将连接放入到集合中if (socketChannel != null) {System.out.println("after connecting...");channels.add(socketChannel);}// 循环遍历集合中的连接for(SocketChannel channel : channels) {// 处理通道中的数据// 设置为非阻塞模式,若通道中没有数据,会返回0,不会阻塞线程channel.configureBlocking(false);int read = channel.read(buffer);if(read > 0) {buffer.flip();ByteBufferUtil.debugRead(buffer);buffer.clear();System.out.println("after reading");}}}} catch (IOException e) {e.printStackTrace();}}}这样写存在一个问题,因为设置为了非阻塞,会一直执行 while (true) 中的代码,CPU 一直处于忙碌状态,会使得性能变低,所以实际情况中不使用这种方法处理请求
3、Selector
多路复用
单线程可以配合 Selector 完成对多个 Channel 可读写事件的监控,这称之为多路复用
多路复用仅针对网络 IO,普通文件 IO 无法利用多路复用如果不用 Selector 的非阻塞模式,线程大部分时间都在做无用功,而 Selector 能够保证有可连接事件时才去连接有可读事件才去读取有可写事件才去写入限于网络传输能力,Channel 未必时时可写,一旦 Channel 可写,会触发 Selector 的可写事件4、使用及 Accpet 事件
要使用 Selector 实现多路复用,服务端代码如下改进
public class SelectServer {public static void main(String[] args) {ByteBuffer buffer = ByteBuffer.allocate(16);// 获得服务器通道try(ServerSocketChannel server = ServerSocketChannel.open()) {server.bind(new InetSocketAddress(8080));// 创建选择器Selector selector = Selector.open();// 通道必须设置为非阻塞模式server.configureBlocking(false);// 将通道注册到选择器中,并设置感兴趣的事件server.register(selector, SelectionKey.OP_ACCEPT);while (true) {// 若没有事件就绪,线程会被阻塞,反之不会被阻塞。从而避免了CPU空转// 返回值为就绪的事件个数int ready = selector.select();System.out.println("selector ready counts : " + ready);// 获取所有事件SetselectionKeys = selector.selectedKeys();// 使用迭代器遍历事件Iteratoriterator = selectionKeys.iterator();while (iterator.hasNext()) {SelectionKey key = iterator.next();// 判断key的类型if(key.isAcceptable()) {// 获得key对应的channelServerSocketChannel channel = (ServerSocketChannel) key.channel();System.out.println("before accepting...");// 获取连接并处理,而且是必须处理,否则需要取消SocketChannel socketChannel = channel.accept();System.out.println("after accepting...");// 处理完毕后移除iterator.remove();}}}} catch (IOException e) {e.printStackTrace();}}}步骤解析
获得选择器 SelectorSelector selector = Selector.open();将通道设置为非阻塞模式,并注册到选择器中,并设置感兴趣的事件channel 必须工作在非阻塞模式FileChannel 没有非阻塞模式,因此不能配合 selector 一起使用绑定的事件类型可以有connect - 客户端连接成功时触发accept - 服务器端成功接受连接时触发read - 数据可读入时触发,有因为接收能力弱,数据暂不能读入的情况write - 数据可写出时触发,有因为发送能力弱,数据暂不能写出的情况// 通道必须设置为非阻塞模式server.configureBlocking(false);// 将通道注册到选择器中,并设置感兴趣的实践server.register(selector, SelectionKey.OP_ACCEPT);通过 Selector 监听事件,并获得就绪的通道个数,若没有通道就绪,线程会被阻塞阻塞直到绑定事件发生int count = selector.select();阻塞直到绑定事件发生,或是超时(时间单位为 ms)int count = selector.select(long timeout);不会阻塞,也就是不管有没有事件,立刻返回,自己根据返回值检查是否有事件int count = selector.selectNow();获取就绪事件并得到对应的通道,然后进行处理// 获取所有事件SetselectionKeys = selector.selectedKeys();// 使用迭代器遍历事件Iteratoriterator = selectionKeys.iterator(); while (iterator.hasNext()) {SelectionKey key = iterator.next();// 判断key的类型,此处为Accept类型if(key.isAcceptable()) {// 获得key对应的channelServerSocketChannel channel = (ServerSocketChannel) key.channel(); // 获取连接并处理,而且是必须处理,否则需要取消SocketChannel socketChannel = channel.accept(); // 处理完毕后移除iterator.remove();}}事件发生后能否不处理
事件发生后,要么处理,要么取消(cancel),不能什么都不做,否则下次该事件仍会触发,这是因为 nio 底层使用的是水平触发
5、Read 事件
在 Accept 事件中,若有客户端与服务器端建立了连接,需要将其对应的 SocketChannel 设置为非阻塞,并注册到选择其中添加 Read 事件,触发后进行读取操作添加 Read 事件,触发后进行读取操作public class SelectServer {public static void main(String[] args) {ByteBuffer buffer = ByteBuffer.allocate(16);// 获得服务器通道try(ServerSocketChannel server = ServerSocketChannel.open()) {server.bind(new InetSocketAddress(8080));// 创建选择器Selector selector = Selector.open();// 通道必须设置为非阻塞模式server.configureBlocking(false);// 将通道注册到选择器中,并设置感兴趣的实践server.register(selector, SelectionKey.OP_ACCEPT);// 为serverKey设置感兴趣的事件while (true) {// 若没有事件就绪,线程会被阻塞,反之不会被阻塞。从而避免了CPU空转// 返回值为就绪的事件个数int ready = selector.select();System.out.println("selector ready counts : " + ready);// 获取所有事件SetselectionKeys = selector.selectedKeys();// 使用迭代器遍历事件Iteratoriterator = selectionKeys.iterator();while (iterator.hasNext()) {SelectionKey key = iterator.next();// 判断key的类型if(key.isAcceptable()) {// 获得key对应的channelServerSocketChannel channel = (ServerSocketChannel) key.channel();System.out.println("before accepting...");// 获取连接SocketChannel socketChannel = channel.accept();System.out.println("after accepting...");// 设置为非阻塞模式,同时将连接的通道也注册到选择其中socketChannel.configureBlocking(false);socketChannel.register(selector, SelectionKey.OP_READ);// 处理完毕后移除iterator.remove();} else if (key.isReadable()) {SocketChannel channel = (SocketChannel) key.channel();System.out.println("before reading...");channel.read(buffer);System.out.println("after reading...");buffer.flip();ByteBufferUtil.debugRead(buffer);buffer.clear();// 处理完毕后移除iterator.remove();}}}} catch (IOException e) {e.printStackTrace();}}}删除事件
当处理完一个事件后,一定要调用迭代器的 remove 方法移除对应事件,否则会出现错误。原因如下
以我们上面的 Read 事件 的代码为例
当调用了 server.register (selector, SelectionKey.OP_ACCEPT) 后,Selector 中维护了一个集合,用于存放 SelectionKey 以及其对应的通道// WindowsSelectorImpl 中的 SelectionKeyImpl数组private SelectionKeyImpl[] channelArray = new SelectionKeyImpl[8];public class SelectionKeyImpl extends AbstractSelectionKey { // Key对应的通道 final SelChImpl channel; ...}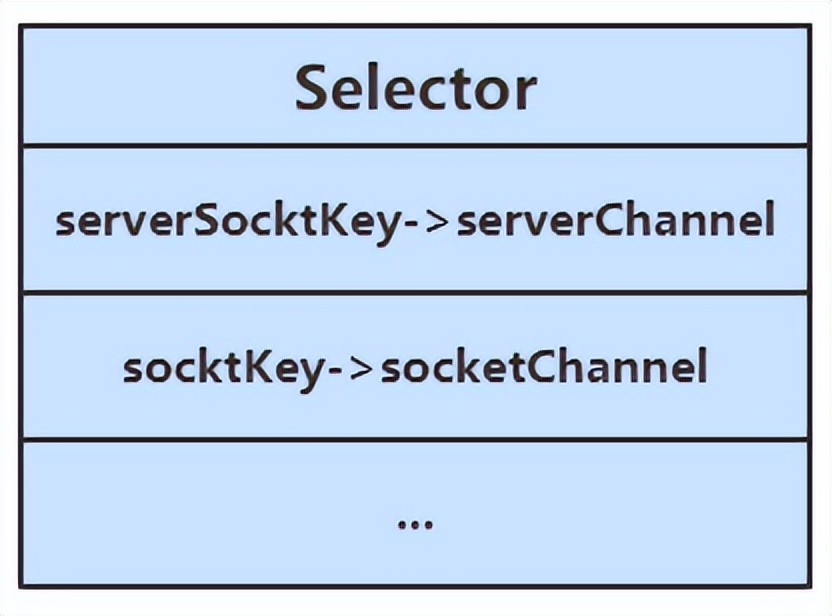
当选择器中的通道对应的事件发生后,selecionKey 会被放到另一个集合中,但是 selecionKey 不会自动移除,所以需要我们在处理完一个事件后,通过迭代器手动移除其中的 selecionKey。否则会导致已被处理过的事件再次被处理,就会引发错误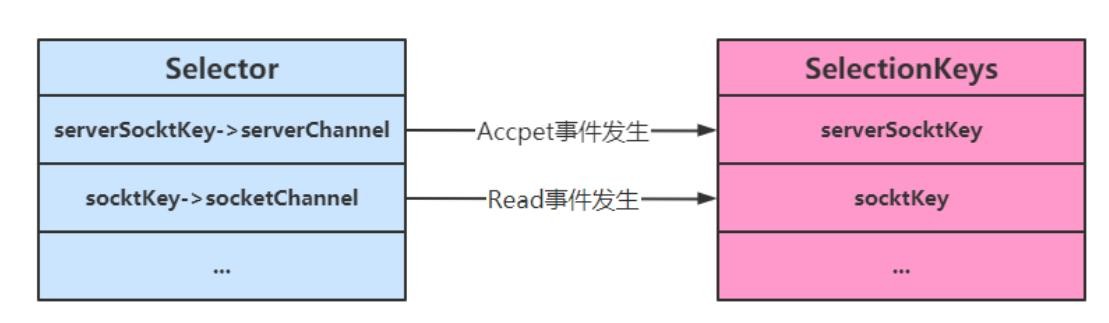
断开处理
当客户端与服务器之间的连接断开时,会给服务器端发送一个读事件,对异常断开和正常断开需要加以不同的方式进行处理
正常断开正常断开时,服务器端的 channel.read (buffer) 方法的返回值为 - 1,所以当结束到返回值为 - 1 时,需要调用 key 的 cancel 方法取消此事件,并在取消后移除该事件int read = channel.read(buffer);// 断开连接时,客户端会向服务器发送一个写事件,此时read的返回值为-1if(read == -1) { // 取消该事件的处理 key.cancel(); channel.close();} else { ...}// 取消或者处理,都需要移除keyiterator.remove();异常断开异常断开时,会抛出 IOException 异常, 在 try-catch 的 catch 块中捕获异常并调用 key 的 cancel 方法即可消息边界
不处理消息边界存在的问题
将缓冲区的大小设置为 4 个字节,发送 2 个汉字(你好),通过 decode 解码并打印时,会出现乱码
ByteBuffer buffer = ByteBuffer.allocate(4);// 解码并打印System.out.println(StandardCharsets.UTF_8.decode(buffer));你这是因为 UTF-8 字符集下,1 个汉字占用 3 个字节,此时缓冲区大小为 4 个字节,一次读时间无法处理完通道中的所有数据,所以一共会触发两次读事件。这就导致 你好 的 好 字被拆分为了前半部分和后半部分发送,解码时就会出现问题
处理消息边界
传输的文本可能有以下三种情况
文本大于缓冲区大小此时需要将缓冲区进行扩容发生半包现象发生粘包现象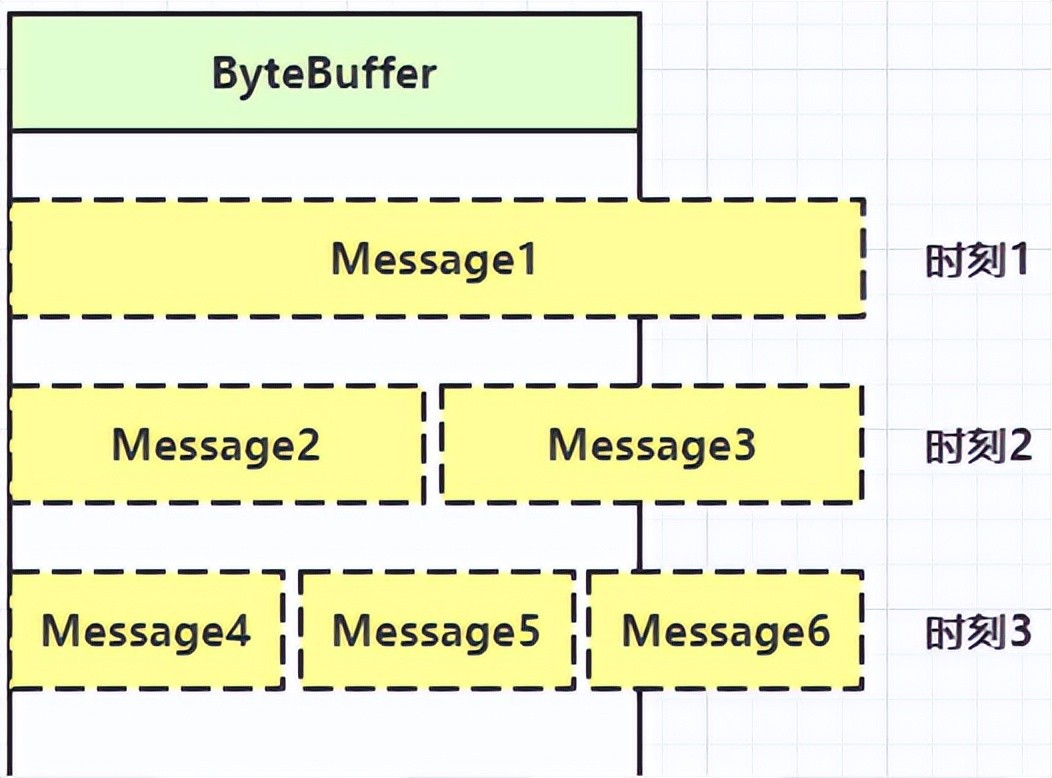
解决思路大致有以下三种
固定消息长度,数据包大小一样,服务器按预定长度读取,当发送的数据较少时,需要将数据进行填充,直到长度与消息规定长度一致。缺点是浪费带宽另一种思路是按分隔符拆分,缺点是效率低,需要一个一个字符地去匹配分隔符TLV 格式,即 Type 类型、Length 长度、Value 数据(也就是在消息开头用一些空间存放后面数据的长度),如 HTTP 请求头中的 Content-Type 与 Content-Length。类型和长度已知的情况下,就可以方便获取消息大小,分配合适的 buffer,缺点是 buffer 需要提前分配,如果内容过大,则影响 server 吞吐量Http 1.1 是 TLV 格式Http 2.0 是 LTV 格式
下文的消息边界处理方式为第二种:按分隔符拆分
附件与扩容
Channel 的 register 方法还有第三个参数:附件,可以向其中放入一个 Object 类型的对象,该对象会与登记的 Channel 以及其对应的 SelectionKey 绑定,可以从 SelectionKey 获取到对应通道的附件
public final SelectionKey register(Selector sel, int ops, Object att)可通过 SelectionKey 的 attachment () 方法获得附件
ByteBuffer buffer = (ByteBuffer) key.attachment();我们需要在 Accept 事件发生后,将通道注册到 Selector 中时,对每个通道添加一个 ByteBuffer 附件,让每个通道发生读事件时都使用自己的通道,避免与其他通道发生冲突而导致问题
// 设置为非阻塞模式,同时将连接的通道也注册到选择其中,同时设置附件socketChannel.configureBlocking(false);ByteBuffer buffer = ByteBuffer.allocate(16);// 添加通道对应的Buffer附件socketChannel.register(selector, SelectionKey.OP_READ, buffer);当 Channel 中的数据大于缓冲区时,需要对缓冲区进行扩容操作。此代码中的扩容的判定方法: Channel 调用 compact 方法后,的 position 与 limit 相等,说明缓冲区中的数据并未被读取(容量太小),此时创建新的缓冲区,其大小扩大为两倍。同时还要将旧缓冲区中的数据拷贝到新的缓冲区中,同时调用 SelectionKey 的 attach 方法将新的缓冲区作为新的附件放入 SelectionKey 中
// 如果缓冲区太小,就进行扩容if (buffer.position() == buffer.limit()) {ByteBuffer newBuffer = ByteBuffer.allocate(buffer.capacity()*2);// 将旧buffer中的内容放入新的buffer中ewBuffer.put(buffer);// 将新buffer作为附件放到key中key.attach(newBuffer);}改造后的服务器代码如下
public class SelectServer {public static void main(String[] args) {// 获得服务器通道try(ServerSocketChannel server = ServerSocketChannel.open()) {server.bind(new InetSocketAddress(8080));// 创建选择器Selector selector = Selector.open();// 通道必须设置为非阻塞模式server.configureBlocking(false);// 将通道注册到选择器中,并设置感兴趣的事件server.register(selector, SelectionKey.OP_ACCEPT);// 为serverKey设置感兴趣的事件while (true) {// 若没有事件就绪,线程会被阻塞,反之不会被阻塞。从而避免了CPU空转// 返回值为就绪的事件个数int ready = selector.select();System.out.println("selector ready counts : " + ready);// 获取所有事件SetselectionKeys = selector.selectedKeys();// 使用迭代器遍历事件Iteratoriterator = selectionKeys.iterator();while (iterator.hasNext()) {SelectionKey key = iterator.next();iterator.remove();// 判断key的类型if(key.isAcceptable()) {// 获得key对应的channelServerSocketChannel channel = (ServerSocketChannel) key.channel();System.out.println("before accepting...");// 获取连接SocketChannel socketChannel = channel.accept();System.out.println("after accepting...");// 设置为非阻塞模式,同时将连接的通道也注册到选择其中,同时设置附件socketChannel.configureBlocking(false);ByteBuffer buffer = ByteBuffer.allocate(16);socketChannel.register(selector, SelectionKey.OP_READ, buffer);} else if (key.isReadable()) {SocketChannel channel = (SocketChannel) key.channel();System.out.println("before reading...");// 通过key获得附件(buffer)ByteBuffer buffer = (ByteBuffer) key.attachment();int read = channel.read(buffer);if(read == -1) {key.cancel();channel.close();} else {// 通过分隔符来分隔buffer中的数据split(buffer);// 如果缓冲区太小,就进行扩容if (buffer.position() == buffer.limit()) {ByteBuffer newBuffer = ByteBuffer.allocate(buffer.capacity()*2);// 将旧buffer中的内容放入新的buffer中buffer.flip();newBuffer.put(buffer);// 将新buffer放到key中作为附件key.attach(newBuffer);}}System.out.println("after reading..."); }}}} catch (IOException e) {e.printStackTrace();}} private static void split(ByteBuffer buffer) {buffer.flip();for(int i = 0; i < buffer.limit(); i++) {// 遍历寻找分隔符// get(i)不会移动positionif (buffer.get(i) == '\n') {// 缓冲区长度int length = i+1-buffer.position();ByteBuffer target = ByteBuffer.allocate(length);// 将前面的内容写入target缓冲区for(int j = 0; j < length; j++) {// 将buffer中的数据写入target中target.put(buffer.get());}// 打印结果ByteBufferUtil.debugAll(target);}}// 切换为写模式,但是缓冲区可能未读完,这里需要使用compactbuffer.compact();}}ByteBuffer 的大小分配
每个 channel 都需要记录可能被切分的消息,因为 ByteBuffer 不能被多个 channel 共同使用,因此需要为每个 channel 维护一个独立的 ByteBufferByteBuffer 不能太大,比如一个 ByteBuffer 1Mb 的话,要支持百万连接就要 1Tb 内存,因此需要设计大小可变的 ByteBuffer分配思路可以参考一种思路是首先分配一个较小的 buffer,例如 4k,如果发现数据不够,再分配 8k 的 buffer,将 4k buffer 内容拷贝至 8k buffer,优点是消息连续容易处理,缺点是数据拷贝耗费性能另一种思路是用多个数组组成 buffer,一个数组不够,把多出来的内容写入新的数组,与前面的区别是消息存储不连续解析复杂,优点是避免了拷贝引起的性能损耗6、Write 事件
服务器通过 Buffer 向通道中写入数据时,可能因为通道容量小于 Buffer 中的数据大小,导致无法一次性将 Buffer 中的数据全部写入到 Channel 中,这时便需要分多次写入,具体步骤如下
执行一次写操作,向将 buffer 中的内容写入到 SocketChannel 中,然后判断 Buffer 中是否还有数据若 Buffer 中还有数据,则需要将 SockerChannel 注册到 Seletor 中,并关注写事件,同时将未写完的 Buffer 作为附件一起放入到 SelectionKey 中 int write = socket.write(buffer);// 通道中可能无法放入缓冲区中的所有数据if (buffer.hasRemaining()) {// 注册到Selector中,关注可写事件,并将buffer添加到key的附件中socket.configureBlocking(false);socket.register(selector, SelectionKey.OP_WRITE, buffer);}添加写事件的相关操作 key.isWritable(),对 Buffer 再次进行写操作每次写后需要判断 Buffer 中是否还有数据(是否写完)。若写完,需要移除 SelecionKey 中的 Buffer 附件,避免其占用过多内存,同时还需移除对写事件的关注SocketChannel socket = (SocketChannel) key.channel();// 获得bufferByteBuffer buffer = (ByteBuffer) key.attachment();// 执行写操作int write = socket.write(buffer);System.out.println(write);// 如果已经完成了写操作,需要移除key中的附件,同时不再对写事件感兴趣if (!buffer.hasRemaining()) {key.attach(null);key.interestOps(0);}整体代码如下
public class WriteServer {public static void main(String[] args) {try(ServerSocketChannel server = ServerSocketChannel.open()) {server.bind(new InetSocketAddress(8080));server.configureBlocking(false);Selector selector = Selector.open();server.register(selector, SelectionKey.OP_ACCEPT);while (true) {selector.select();SetselectionKeys = selector.selectedKeys();Iteratoriterator = selectionKeys.iterator();while (iterator.hasNext()) {SelectionKey key = iterator.next();// 处理后就移除事件iterator.remove();if (key.isAcceptable()) {// 获得客户端的通道SocketChannel socket = server.accept();// 写入数据StringBuilder builder = new StringBuilder();for(int i = 0; i < 500000000; i++) {builder.append("a");}ByteBuffer buffer = StandardCharsets.UTF_8.encode(builder.toString());// 先执行一次Buffer->Channel的写入,如果未写完,就添加一个可写事件int write = socket.write(buffer);System.out.println(write);// 通道中可能无法放入缓冲区中的所有数据if (buffer.hasRemaining()) {// 注册到Selector中,关注可写事件,并将buffer添加到key的附件中socket.configureBlocking(false);socket.register(selector, SelectionKey.OP_WRITE, buffer);}} else if (key.isWritable()) {SocketChannel socket = (SocketChannel) key.channel();// 获得bufferByteBuffer buffer = (ByteBuffer) key.attachment();// 执行写操作int write = socket.write(buffer);System.out.println(write);// 如果已经完成了写操作,需要移除key中的附件,同时不再对写事件感兴趣if (!buffer.hasRemaining()) {key.attach(null);key.interestOps(0);}}}}} catch (IOException e) {e.printStackTrace();}}}7、优化
多线程优化
充分利用多核 CPU,分两组选择器
单线程配一个选择器(Boss),专门处理 accept 事件创建 cpu 核心数的线程(Worker),每个线程配一个选择器,轮流处理 read 事件实现思路
创建一个负责处理 Accept 事件的 Boss 线程,与多个负责处理 Read 事件的 Worker 线程Boss 线程执行的操作接受并处理 Accepet 事件,当 Accept 事件发生后,调用 Worker 的 register (SocketChannel socket) 方法,让 Worker 去处理 Read 事件,其中需要根据标识 robin 去判断将任务分配给哪个 Worker// 创建固定数量的WorkerWorker[] workers = new Worker[4];// 用于负载均衡的原子整数AtomicInteger robin = new AtomicInteger(0);// 负载均衡,轮询分配Workerworkers[robin.getAndIncrement()% workers.length].register(socket);register (SocketChannel socket) 方法会通过同步队列完成 Boss 线程与 Worker 线程之间的通信,让 SocketChannel 的注册任务被 Worker 线程执行。添加任务后需要调用 selector.wakeup () 来唤醒被阻塞的 Selectorpublic void register(final SocketChannel socket) throws IOException { // 只启动一次 if (!started) { // 初始化操作 } // 向同步队列中添加SocketChannel的注册事件 // 在Worker线程中执行注册事件 queue.add(new Runnable() { @Override public void run() { try { socket.register(selector, SelectionKey.OP_READ); } catch (IOException e) { e.printStackTrace(); } } }); // 唤醒被阻塞的Selector // select类似LockSupport中的park,wakeup的原理类似LockSupport中的unpark selector.wakeup();}Worker 线程执行的操作从同步队列中获取注册任务,并处理 Read 事件实现代码
public class ThreadsServer {public static void main(String[] args) {try (ServerSocketChannel server = ServerSocketChannel.open()) {// 当前线程为Boss线程Thread.currentThread().setName("Boss");server.bind(new InetSocketAddress(8080));// 负责轮询Accept事件的SelectorSelector boss = Selector.open();server.configureBlocking(false);server.register(boss, SelectionKey.OP_ACCEPT);// 创建固定数量的WorkerWorker[] workers = new Worker[4];// 用于负载均衡的原子整数AtomicInteger robin = new AtomicInteger(0);for(int i = 0; i < workers.length; i++) {workers[i] = new Worker("worker-"+i);}while (true) {boss.select();SetselectionKeys = boss.selectedKeys();Iteratoriterator = selectionKeys.iterator();while (iterator.hasNext()) {SelectionKey key = iterator.next();iterator.remove();// BossSelector负责Accept事件if (key.isAcceptable()) {// 建立连接SocketChannel socket = server.accept();System.out.println("connected... ");socket.configureBlocking(false);// socket注册到Worker的Selector中System.out.println("before read...");// 负载均衡,轮询分配Workerworkers[robin.getAndIncrement()% workers.length].register(socket);System.out.println("after read...");}}}} catch (IOException e) {e.printStackTrace();}} static class Worker implements Runnable {private Thread thread;private volatile Selector selector;private String name;private volatile boolean started = false;/** * 同步队列,用于Boss线程与Worker线程之间的通信 */private ConcurrentLinkedQueuequeue; public Worker(String name) {this.name = name;} public void register(final SocketChannel socket) throws IOException {// 只启动一次if (!started) {thread = new Thread(this, name);selector = Selector.open();queue = new ConcurrentLinkedQueue<>();thread.start();started = true;}// 向同步队列中添加SocketChannel的注册事件// 在Worker线程中执行注册事件queue.add(new Runnable() {@Overridepublic void run() {try {socket.register(selector, SelectionKey.OP_READ);} catch (IOException e) {e.printStackTrace();}}});// 唤醒被阻塞的Selector// select类似LockSupport中的park,wakeup的原理类似LockSupport中的unparkselector.wakeup();} @Overridepublic void run() {while (true) {try {selector.select();// 通过同步队列获得任务并运行Runnable task = queue.poll();if (task != null) {// 获得任务,执行注册操作task.run();}SetselectionKeys = selector.selectedKeys();Iteratoriterator = selectionKeys.iterator();while(iterator.hasNext()) {SelectionKey key = iterator.next();iterator.remove();// Worker只负责Read事件if (key.isReadable()) {// 简化处理,省略细节SocketChannel socket = (SocketChannel) key.channel();ByteBuffer buffer = ByteBuffer.allocate(16);socket.read(buffer);buffer.flip();ByteBufferUtil.debugAll(buffer);}}} catch (IOException e) {e.printStackTrace();}}}}}